 Merken
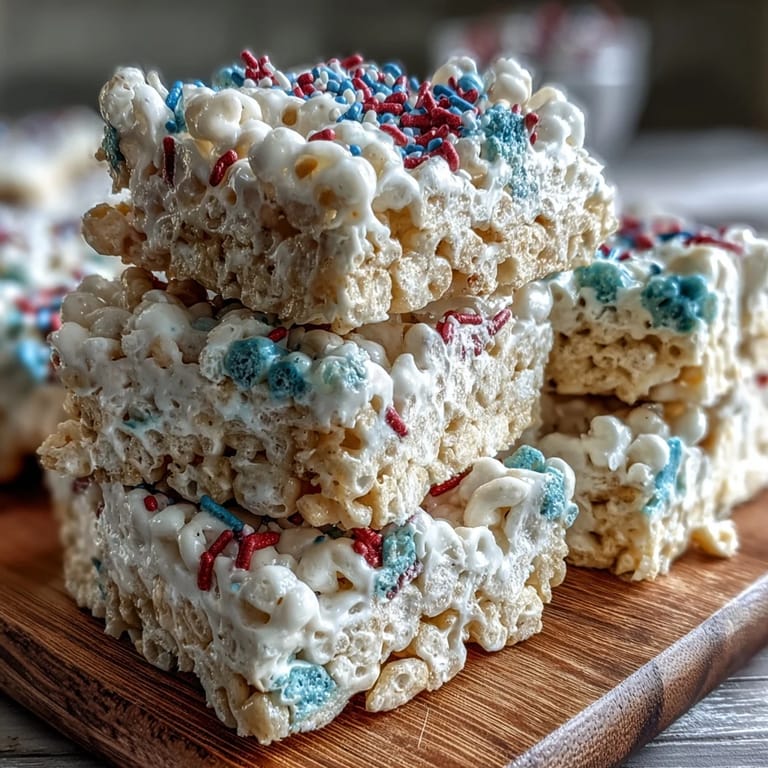
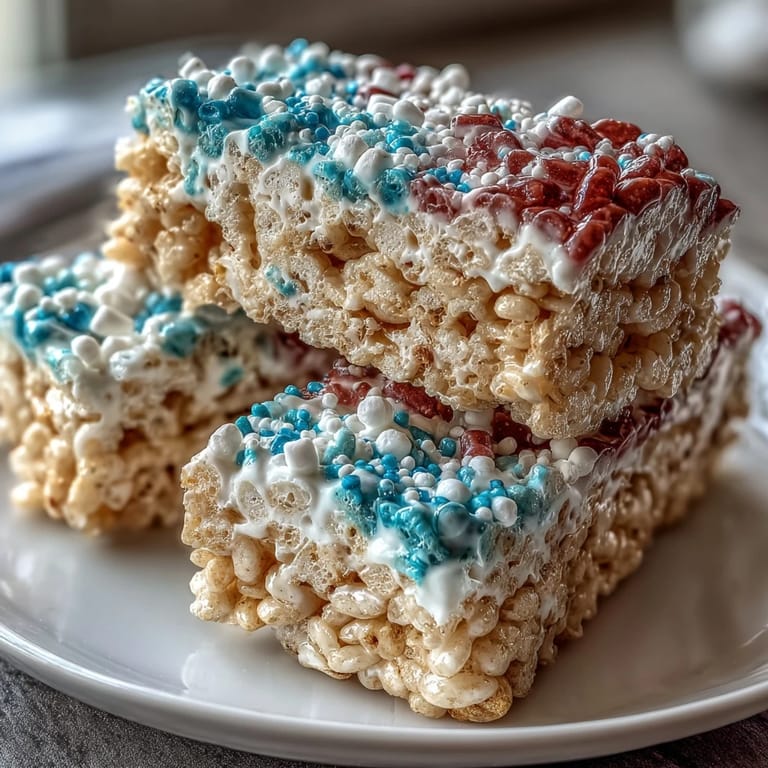
 My neighbor knocked on my door that humid July afternoon with a half-empty bag of mini marshmallows and a wild idea: patriotic Rice Krispies treats stacked in red, white, and blue. I'd made these as a kid, but never with intention, never with layers. We spent the next hour in my kitchen, laughing at marshmallow mishaps and debating which shade of red looked most festive. That batch became the talk of our block's fireworks night, and now it's my go-to when summer needs a little color.
I made these for my daughter's school Independence Day potluck, and watching her carry them in with such pride was worth every sticky finger in my kitchen. The other parents asked for the recipe before anyone even took a bite—they'd already decided these treats were winners based on looks alone.
Ingredients
- Rice Krispies cereal, 6 cups: This is your structure and crunch; don't substitute with generic brands, as the flavor and texture really do matter when everything else is so simple.
- Mini marshmallows, 1 (10 oz) bag: Mini ones melt faster and distribute color more evenly than large ones, which tend to clump.
- Unsalted butter, 3 tbsp divided: Dividing it equally across layers keeps each one consistent; the butter helps the marshmallows meld with the cereal without making everything greasy.
- Vanilla extract, 1/2 tsp: This subtle flavoring in the white layer makes people pause and ask what that warmth is, even though they can't quite name it.
- Red gel food coloring: Gel is non-negotiable here—liquid coloring will make your mixture soggy and ruin the whole effect.
- Blue gel food coloring: Same reasoning as red; gel means vibrant, concentrated color without excess moisture.
- Red, white, and blue sprinkles (optional): These are purely visual insurance, a final sparkle if your layers need a little extra personality.
Tired of Takeout? 🥡
Get 10 meals you can make faster than delivery arrives. Seriously.
One email. No spam. Unsubscribe anytime.
Instructions
- Prepare your canvas:
- Line a 9x9-inch baking pan with parchment paper and give it a light grease—this setup means you'll lift these treats out with zero sticking, and cleanup is a dream. The parchment becomes your best friend here.
- Divide and conquer:
- Split your marshmallows and butter into three equal piles (about 3 1/3 cups marshmallows and 1 tbsp butter per color layer). This small bit of planning prevents you from running short on one color or ending up with uneven layers.
- Build the red foundation:
- Melt 1 tbsp butter in a large saucepan over low heat, then add your first batch of marshmallows, stirring constantly until they're completely smooth and melted. Add just a few drops of red gel coloring—a little goes a long way—and keep stirring until you reach that perfect July sunset shade.
- Add the cereal to red:
- Pour in 2 cups Rice Krispies and fold everything together gently until every piece is coated in that marshmallow-butter mixture. The consistency should feel slightly tacky but not wet—you're building a layer, not a puddle.
- Press the red into place:
- Working while it's still warm, press this mixture firmly and evenly into the bottom of your prepared pan. If your hands are getting sticky, wet them slightly or use a lightly greased spatula to smooth it down.
- Create the white middle:
- Wipe out your saucepan, then repeat the process: melt 1 tbsp butter, add the second batch of marshmallows, stir in the vanilla extract (which will release that lovely warm smell into your kitchen). Add your second batch of Rice Krispies and fold gently.
- Layer white over red:
- Gently but firmly press the white mixture over the red layer, being careful not to disturb what's underneath. Work slowly, letting the pressure do the job rather than aggressive pressing.
- Top with blue:
- Repeat everything one final time: melt butter, add marshmallows, color deeply with blue gel food coloring, fold in the remaining Rice Krispies. Press this final layer down with the same gentle firmness.
- Optional sparkle:
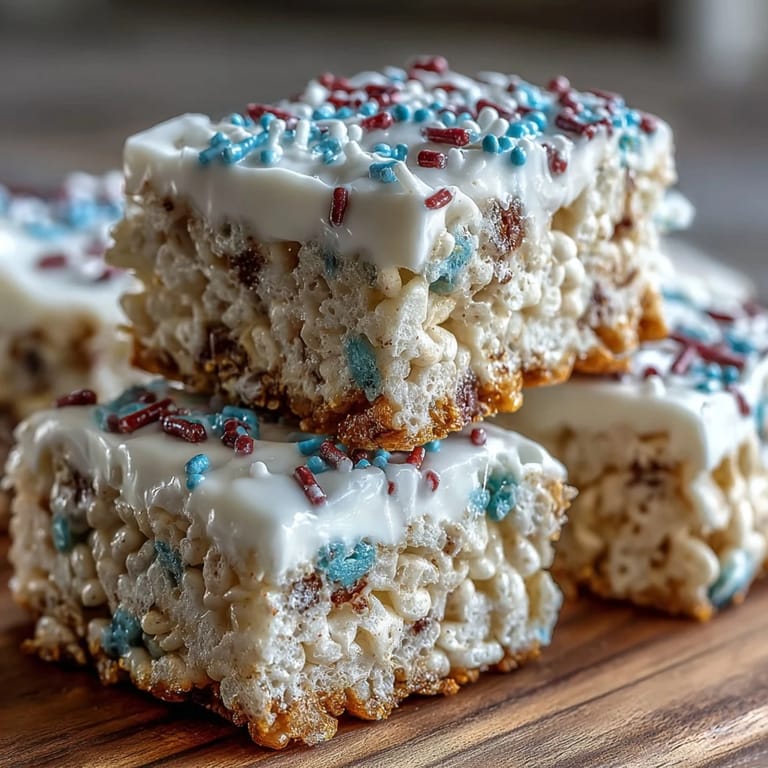
- If you're feeling celebratory, sprinkle red, white, and blue sprinkles across the top while it's still slightly warm—they'll stick beautifully.
- Let it set:
- Give these treats a full hour to cool and firm up; patience here means clean, perfect squares rather than crumbly disasters. Once set, use that parchment to lift everything out, then slice with a sharp knife into 16 squares.
 Merken
 My son bit into one of these and declared, with absolute certainty, that he'd become a chef—it made me realize that sometimes the simplest things, dressed up with a little color and intention, feel like magic to the people we're feeding. That's what these treats are really about.
The Secret Behind the Layers
What makes this recipe feel more impressive than it actually is, is the fact that layering is just repetition—you're doing the exact same thing three times, which somehow tricks people into thinking you've accomplished something far more complicated. The marshmallow-butter-cereal ratio stays constant, so once you've nailed the first layer, the other two follow naturally. This is the kind of recipe that rewards patience over skill, which is why even kids can execute it beautifully.
Why Gel Coloring Changes Everything
I learned this the hard way on my first attempt, when I grabbed liquid food coloring without thinking. The red layer became soft and sticky, the white layer started to separate, and by the time I got to blue, I realized my mistake—but I kept going, hoping it would somehow work itself out. It didn't. The treats tasted fine, but they looked muddy and sad, and I couldn't cut them cleanly. Gel coloring is concentrated, so a few drops give you vivid color without adding moisture, keeping your mixture at exactly the right consistency.
Timing, Storage, and Last-Minute Tricks
These treats are most beautiful right after they've cooled, so plan to make them the morning of your gathering if possible. The layers stay distinct for at least three days in an airtight container, though honestly, they rarely last that long in a house where people know about them. If you're feeling adventurous, try adding a pinch of sea salt to the white layer—it's a subtle thing that makes people wonder what makes these different from standard Rice Krispies treats.
- Make sure your hands are only lightly damp when pressing layers, as too much moisture will cause the mixture to stick rather than compress.
- If you can't find mini marshmallows, regular ones work too, but you'll need to chop them slightly and give them extra stirring time to melt evenly.
- These treats taste best at room temperature, so pull them from storage about 20 minutes before serving for the best texture and flavor.
 Merken
 These treats feel like summer in square form, and they've become my quiet rebellion against overly complicated holiday baking. Nothing says patriotic celebration quite like three perfect layers of color and nostalgia, made with nothing more than patience and butter.
Fragen & Antworten zum Rezept
- → Wie erzielt man leuchtende Farben bei den Schichten?
Verwenden Sie Gel-Lebensmittelfarben, da diese intensiver sind und die Konsistenz des Marshmallow-Gemischs nicht verwässern.
- → Kann man die Schichten vorbereiten und später servieren?
Ja, die Schichten sollten mindestens eine Stunde abkühlen und können bis zu 3 Tage luftdicht gelagert werden.
- → Wie verhindert man, dass die Masse an den Händen klebt?
Leicht gefettete Hände oder ein eingefetteter Spatel helfen beim gleichmäßigen Andrücken der Schichten ohne Kleben.
- → Ist es möglich, die Butter durch eine Alternative zu ersetzen?
Butter sorgt für die beste Textur und Geschmack, aber für eine vegane Option kann Margarine verwendet werden, was jedoch das Ergebnis leicht verändern kann.
- → Wie kann man die Schichten dekorativ gestalten?
Optional können rote, weiße und blaue Streusel auf die noch warme oberste Schicht gestreut werden, um einen festlichen Look zu erzielen.